Showing posts with label Oil Olive. Show all posts

Tuesday, May 29, 2012

Roasted Dilly Asparagus

Asparagus!

Ah asparagus - that strange little wonderful vegetable that shows up in our grocery stores come winter. The green stalks usually bundled in 1 lb bunches held together by two blue or purple rubber bands. So many ways to enjoy this vegetable all of them wonderful! It is to this day one hearty little vegetable that can spring from patches of earth on the side of roads and railroad tracks at the first sign of spring weather.

Asparagus sprouting from the ground

Asparagus field
One of my favorite ways of cooking asparagus is roasting it. Steaming it works well but there is a razor fine line where asparagus goes from delicious to mushy! I am not saying that roasting asparagus can't be over cooked, but the dry heat from the oven tends to dry the asparagus out so it isn't mushy.


Here is what you'll need:
1 1lb Asparagus
Olive oil
salt
pepper
dill (or your favorite spice/herb)


Here is what you do:

Trim the woody end off the asparagus (for a nifty trick watch the video on this blog). Brush the asparagus generously with olive oil. Spread the asparagus on a foil lined cookie sheet. Sprinkle with salt, pepper and dill (or another spice/herb). Pop the asparagus in a pre-heated 450 F oven for 20 minutes. Best to roll them over half way through the roasting time! 


Skinnier asparagus may require less time in the oven while fat asparagus may need a little more. So just keep an eye on them!

Serve as a vegetable with dinner or cut up on a salad cold. Or just munch on them as a snack.


Enjoy!

~ Recipe ~

1 lb Asparagus (trimmed)
olive oil
Salt and Pepper
Dill (or another spice/herb)

Pre-heat an oven to 450 F. Brush the asparagus generously with olive oil and arrange on a foil lined cookie sheet. Sprinkle with salt and pepper and dill. Roast for ~20 minutes. Turn the asparagus half way through the roasting time.  

Wednesday, May 9, 2012

Cranberry Pistachio Biscotti!


It was one of those days....I had the munchies (work induced) and I needed something sweet and carb like, but there was nothing that was fitting that description in my cabinet. I could walk to the store but I know how that always turns out! I buy Oreos (random but did you know these little favorites are 100 years old!) or Fig Newtons (these are also over 100 years old!) and then consume nearly the whole box and while I am not one to worry about calories - eating that many cookies is never a good idea. I usually never buy cookies in the store and I tend not to eat a whole lot of sugar or processed foods so while I may satiate my craving I don't feel very well later and sets off another wave of food cravings as my body, that is now hopped up on sugar, tries to handle the situation. So, while making the decision to bake when I should be working usually leads me to waste and hour getting up and down from my desk and walking in to the kitchen in the end I usually yield and bake something. I decided to cut the wasted hour out of the equation and just bake some biscotti. I would be happier at the end, I would not have wasted the hour, I would have something to blog and would have something to have with afternoon coffee while I worked. 

Now what kind of biscotti should I bake. Well, I still had pistachios from an impulse buy one night when ESFSW and I were at Whole Foods buying fish for dinner and 1 lb of pistachios were on sale for a ridiculously low price! And I still had Craisens® which are now ancient (embarrassed to say probably 2 to 3 years old!) and really only good for baking. I think I should just pair these classics together (nothing original or crazy here!)


The pistachios were sadly still in their little shells so I did have to take the time to shell them. But, that also gave me permission though to snack on a few. I did this task while reading so I made use of my time.

Cranberry and Pistachio a classic!
I am not an expert biscotti maker at all. One of my favorite kinds is actually a dried cherry and pistachio recipe that I got from a good friend. So I relied on the interweb to give me a recipe. Simple search and glance over of the results and I decided that the recipe from All Recipes looked the simplest and I had all the ingredients!

You can find the recipe on their site by clicking here: Cranberry Pistachio Biscotti. I will also re-write it below all my pictures!


The recipe used Olive Oil instead of butter. So the creaming the fat and sugar together yielded a very different product that creamed butter and sugar. In some ways it was much easier than creaming butter since olive oil is a liquid at room temp. You probably don't need a mixer, although these babies always help make baking easier! I can't wait for the day I have one of my own! This one is my roommates.


Next you need 2 eggs (the other one is already in the mixer), vanilla and almond extract. I didn't not have almond extract so I used orange. Citrus pairs well with both cranberries and pistachio so I figured it would be terrible if my biscotti had an orange flavor.


After you beat in the egg and the extracts add the flour and other dry ingredients and mix well!


Stir in dried cranberries and pistachios by hand. I chopped the pistachios up a bit before hand so that they weren't such large chunks. It also means there will be more pistachio spread throughout!


Form the dough in to two logs and place on a greased cookie sheet (or use a baking mat like I did!). The dough is a little sticky. If you hands are wet the dough won't stick as much. If you find it impossible to work with you can also refrigerate the dough and then form in into logs when it is cold. Need at least an hour in the fridge or 30 minutes in the freezer.

After you bake the logs, you then remove them from the oven and carefully (they are hot) with a sharp knife cut the logs into sections. Spread out the cross sections on the cookie sheet and return them to the oven. This step dries the biscotti out.


All done! They just need to cool before I can start snacking! So while I waited for them to cool I made some coffee!


Happy Baking and Noshing!


Recipe from All Recipes (slightly modified):
1/4 cup olive oil
1/2 cup sugar
2 tsp vanilla extract
1/2 tsp orange extract
2 eggs
1 3/4 cup flour
1 tsp baking powder
1/2 cup dried cranberries
1 1/2 cup chopped pistachios

Cream olive oil and sugar together. Add eggs, vanilla and orange extract. Beat well. Add dry ingredients (not fruit and nuts) and mix until incorporated. Stir in nuts and dried cranberries by hand. Shape dough into two logs and place on a greased. Bake in pre-heated oven at 375 F for 35 minutes. Remove from oven cut logs into 1 inch thick sections. Bake again for another 10 to 15 minutes (until dry).

~ Let cool and enjoy!

Happy Baking!

Friday, March 30, 2012

Creamy Tomato Basil Soup


Tomato soup is one of those foods that I think is stamped in the American food vernacular. Often served with grilled cheese sandwiches as the meal to comfort and warm. I personally have not made a whole lot of strictly tomato soup. Tomato tends to be the base of a lot of my soups but never the main ingredient. I poked around online a bit looking at recipes and didn't really settle on any particular one, but took parts that I like from several and combined them with my own personal flourish!


Before you embark on this cooking journey, I will warn you that this soup will take a while to make. It is not a throw together, heat to a boil, and serve immediately soup. There are two long steps in this process, which can luckily be divided over the course of a day or two days. The soup will be best the longer it simmers. This allows the flavors of the ingredients to meld and intensify! It will be worth the wait I promise you!

Most of the needed ingredients

Here is what I used:

1 lb fresh grape tomatoes (if you have older ones that are getting wrinkly here's how to use them!)
garlic (at least 6 cloves)
olive oil 
dried basil (1 - 2 Tbs) - yes I mean the dried variety - fresh dried basil will provide the best flavor
30 oz canned diced tomatoes
1 to 2 yams or sweet potatoes depending on size (already cooked and soft)
1 tbs red pepper flakes
salt to taste
2 cups chicken stock - if you are vegetarian or vegan you can substitute with vegetable stock or water
1/2 & 1/2 - if you are dairy intolerant or vegan you can skip this ingredient.

This is what I did:

Pre-heat your oven to 425 F. 

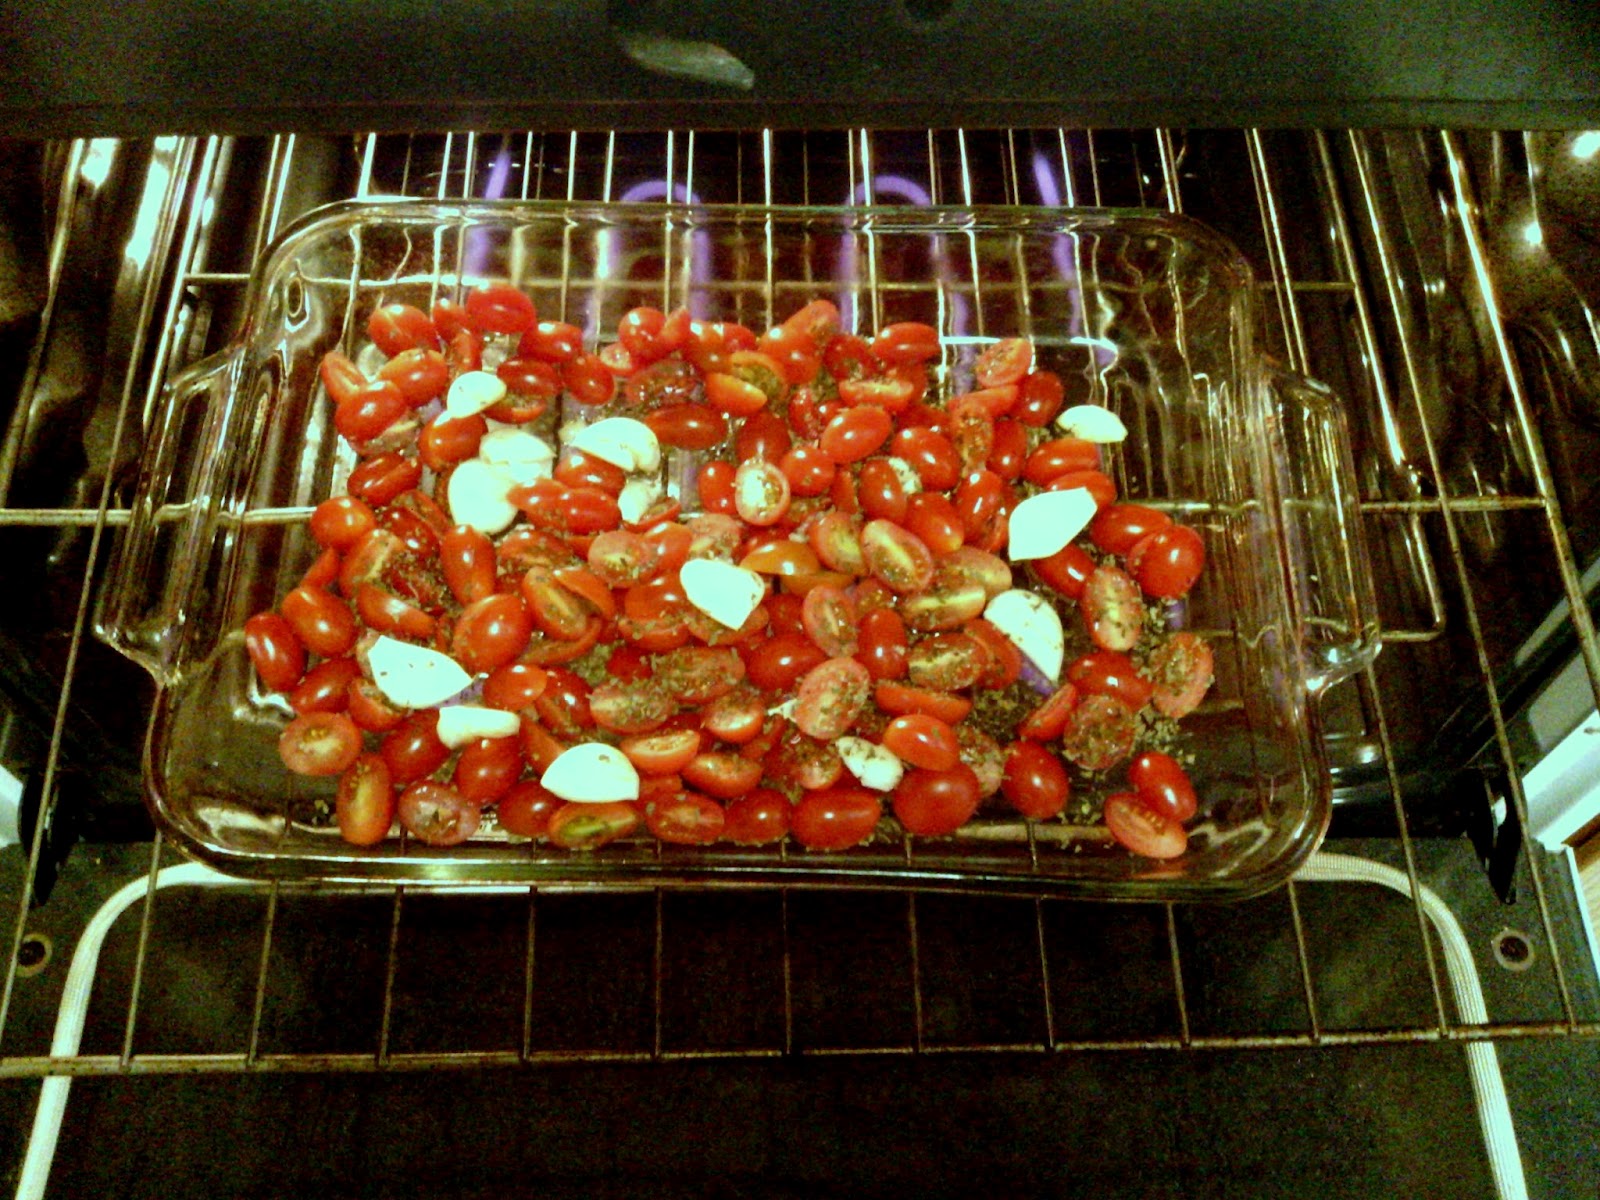
While the oven is heating, cut grape tomatoes in half and place in large baking dish (for easier clean up, line with foil). Crush several cloves of garlic and toss in with the tomatoes (I used 10 to 12 but some of them were rather small). Drizzle with olive oil, sprinkle with salt and douse with dried basil.

Place pan in oven and roast tomatoes for 30 to 40 minutes.

Tomatoes and garlic entering the oven
Toss occasionally while roasting and remove from oven once some of them are starting to char. Let pan cool. If you are doing this step ahead of time (up to 5 days ahead would probably be fine, longer if you plan on freezing them, although things do tend to lose their flavor in the freezer over time). If these are roasted ahead of time, store in a air tight container in the refrigerator. Make sure you save as much of the liquid and scrapings as possible for this is where a lot of the flavor is be found.

Roasted Tomatoes just out of the oven...mmmm they smell good!

Next in a large pot heat some olive oil. Once warm add diced onion and saute until translucent and soft. The longer you saute the onions the better. If you want even more garlic flavor you could add some minced fresh garlic at this point.

Onions starting to cook

Once the onions have started to soften, add cooked yams. I had two small yams in the freezer left over from Thanksgiving! I had been wondering what to do with them and figured this would be a good use for them since they wouldn't be that good re-heated and eaten on their own.

Add the yams

Smash the yam up with a spoon. Add more olive oil if the mixture is getting dry or sticking to the bottom of the pan. Make sure the stove is on high, but not too high that it starts to burn. Add some dried basil and the 1 tsp red pepper flakes. Let the onions and yam combine and start to meld with the basil and pepper. For anyone who might be shy of spicy foods let me put your mind at rest. The red pepper flake will not add that much heat, but will give the tiniest hint of spice and bring out some of the other flavors.

Smash up the yam

Next add the canned diced tomatoes. I used half regular and half fire roasted. Stir to combine all the ingredients.


Pour in the chicken stock. Add the roasted tomatoes and garlic and the remainder of the dried basil.


Turn down the heat to low/ medium low at this point to let the entire thing simmer for about 20 to 30 minutes. This allows the flavors to mix and intensify as some of the liquid cooks off. Give the soup a taste and add more basil or salt to taste. Be careful with the salt because as you let the soup cook it will get saltier.

Once the soup has simmered for a while pull out the immersion blender and blend. If you don't have an immersion blender (in picture) then you can use a regular blender and blend batches of the soup. Make sure if you use a regular blender to be careful. Blending hot liquids can lead to explosions so let steam escape as you blend!

Blending the soup - keep the end fully immersed or else soup will splatter up towards you!

Depending on your time constraints let the soup simmer for another 20 to 30 minutes. Now comes and optional part! If you want your soup extra creamy you can had half and half or heavy cream (using anything else will make the soup too watery, if you want to avoid the fat just skip this step). I was planning on freezing half the soup so I removed the portion I wanted to freeze before adding the dairy product. I have never found dairy based soups freeze and thaw very well. 

Half and Half

Stir in Half and Half
 Serve with toast or cheese and sprinkle basil on top!


 I thought the soup was excellent! I may in the future tweak the recipe a little, but nothing major. If you don't have yams you could also use carrots - about 4. You would cook these with the onions. Here you would not  add the diced tomatoes until the carrots are soft. Or you could roast the carrots ahead of time (or at the same time as the tomatoes, but in a separate pan). I hope you enjoy!