Tuesday, May 29, 2012

Roasted Dilly Asparagus

Asparagus!

Ah asparagus - that strange little wonderful vegetable that shows up in our grocery stores come winter. The green stalks usually bundled in 1 lb bunches held together by two blue or purple rubber bands. So many ways to enjoy this vegetable all of them wonderful! It is to this day one hearty little vegetable that can spring from patches of earth on the side of roads and railroad tracks at the first sign of spring weather.

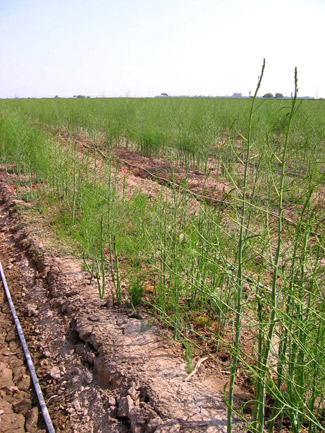
Asparagus sprouting from the ground

Asparagus field
One of my favorite ways of cooking asparagus is roasting it. Steaming it works well but there is a razor fine line where asparagus goes from delicious to mushy! I am not saying that roasting asparagus can't be over cooked, but the dry heat from the oven tends to dry the asparagus out so it isn't mushy.


Here is what you'll need:
1 1lb Asparagus
Olive oil
salt
pepper
dill (or your favorite spice/herb)


Here is what you do:

Trim the woody end off the asparagus (for a nifty trick watch the video on this blog). Brush the asparagus generously with olive oil. Spread the asparagus on a foil lined cookie sheet. Sprinkle with salt, pepper and dill (or another spice/herb). Pop the asparagus in a pre-heated 450 F oven for 20 minutes. Best to roll them over half way through the roasting time! 


Skinnier asparagus may require less time in the oven while fat asparagus may need a little more. So just keep an eye on them!

Serve as a vegetable with dinner or cut up on a salad cold. Or just munch on them as a snack.


Enjoy!

~ Recipe ~

1 lb Asparagus (trimmed)
olive oil
Salt and Pepper
Dill (or another spice/herb)

Pre-heat an oven to 450 F. Brush the asparagus generously with olive oil and arrange on a foil lined cookie sheet. Sprinkle with salt and pepper and dill. Roast for ~20 minutes. Turn the asparagus half way through the roasting time.  

Monday, May 28, 2012

Balsamic Strawberry Galette


Strawberry season in Sunshine-ville is in mid swing as evidenced by $0.97/lb strawberries at the local grocery store. I grew up eating strawberries bought from little farm stands that use to dot the landscape in Happy-ville, so I tend to loath grocery store strawberries. They rarely have much flavor, however at such a good price I figure it would be a good time to try out the recipe for a Balsamic and Honey Strawberry Galette I saw on Pintrest, which hailed from the food blog Honey and Jam. The Honey and Jam blog described this galette in wonderful detail, but I made a few changes. I am a chronic recipe tweaker to the point I don't know if I can follow a recipe word for word!

What you need:
~ Filling ~
1- 1.5 lbs fresh strawberries
2 Tbs honey
4 Tbs Balsamic vinegar
1-2 tsp black pepper (optional)
1-2 tsp cardamom (optional)

~ Crust ~
1/4 lb salted butter
1 1/4 cup flour
~ 2 - 4 Tbs ice water
1-2 tsp black pepper (optional)
1-2 tsp cardamom (optional)


To macerate the strawberries by slicing 1 lb of strawberries and put them in a dish with a lid. Add 4 Tbsp Balsamic vinegar and 2 Tbsp honey. Place lid on the dish and shake to mix the vinegar and honey. Let sit for 1 hour to up to 24 hours (if it is going to be more than an hour then refrigerate the strawberries).

Strawberries macerating in balsamic vinegar and honey
While the strawberries are macerating prep the crust. Sift 1 1/4 cup of flour with the pepper and cardamom. Add the soften butter. With a pastry cutter, two knives or your hands to combine the butter and flour. Once the mixture resembles wet sand start by adding 1 Tbs of water at a time to fully combine.

Flour and butter
The mixture should only just be holding together when you add the water, but most of the butter should be in small pieces.

Butter in flour resembles sand
Add the water and continue to mix. Don't over combine this will result in a tough crust instead of a delicate and flaky crust. Also don't add too much water this will make the crust soggy. The crust should just be holding together but still a little crumbly.

Cold water added to bring it together
Shape into a ball, wrap in wax paper and refrigerate for 30 minutes. Once cold again place the ball of pastry between two sheets of wax paper and roll flat to 1/4 to 1/8 inch thickness. Dust the top with flour.

Once rolled out dust the top with flour
To the strawberry mixture add 1 Tbs flour and 1 Tbs corn starch and mix well.

Flour and cornstarch added to the strawberries

They look so good!
Pile the strawberry mixture in the center of the pastry crust with several inches around the edge. Fold the edges of the pastry up and over using a soft spatula. Paint the exposed pastry with egg wash.

Paint the crust with  an egg wash
Place the gallette in a 350 F pre-heated oven for ~ 45 minutes. The liquid should be bubbling.

Right out of the oven!
Let it rest a little before serving so the liquid can cool and thicken up a little.

I had enough control to take one more picture before I devoured this!


Enjoy!


Recipe:

~ Filling ~
1- 1.5 lbs fresh strawberries
2 Tbs honey
4 Tbs Balsamic vinegar
1-2 tsp black pepper (optional)
1-2 tsp cardamom (optional)

Slice the strawberries. Mix the balsamic vinegar and honey together and then pour over the strawberries. Let the strawberries sit for at least an hour up to 24 hours. Mix the berries occasionally since liquid pools at the bottom of the bowl.

~ Crust ~
1/4 lb salted butter
1 1/4 cup flour
~ 2 - 4 Tbs ice water
1-2 tsp black pepper (optional)
1-2 tsp cardamom (optional)


Soften butter. Using a pastry cutter, two knives or your hands and cut the butter into the flour (and spices if you are adding them). Once the mixture appears like course wet sand add water 1 Tbs at a time until the mixture is coming together but still a little crumbly. Shape into a ball and refrigerate for 30 minutes. Roll the pastry out between two pieces of wax paper using a rolling pin. Carefully remove the top piece of wax paper and transfer crust to a cookie sheet. I use a baking mat as well, parchment paper works or you can just lightly grease the cookie sheet. Dust the surface lightly with flour.

~ Assemble ~

Add 1 Tbs of flour and 1 Tbs of corn starch (or tapioca) to the strawberries and mix. Pile the strawberries on the pastry crust leaving room to fold the edge of the crust over the fruit. Using a soft spatula and fold the edges up and over the fruit. Brush the exposed pastry with an egg wash. Bake for 45 minutes in a 350 F pre-heated oven. Remove and let set for 10 minutes. Serve by itself for with ice cream.
Saturday, May 19, 2012

Wine Tasting and Horseback Riding

Giant Champagne Bottle Sculpture outside the Winery

ESFSW is an absolutely amazing boyfriend!  Months in advance of our 1 year dating anniversary and my 30th birthday, he planned a day of wine tasting and horseback riding in Temecula! We had reschedule once because of rain and the threat of thunder and lightening on the weekend of our 1 year anniversary. But this lead to our little adventure happening close to my birthday and also allowed us to enjoy an incredible brunch.

Our little outing fell on a Sunday so we decided to skip church and head up to Temecula early and wander around the Old Town section a little bit. Neither of us had been before and it was a really beautiful day. The sun was out but the sky was filled with beautiful puffy clouds and it was cool and crisp! When we were wandering up and down Old Town Front Street we spotted some cool old cars.

The flame job on the one was pretty impressive!

This was our favorite!

The package deal through Wine Country Trails included lunch, wine tasting for two and horseback riding through a vineyard. When we got to Wilson Creek we had a choice to make as far as our lunch options. Normally the lunch special was the choice of boxed lunches that could be enjoyed anywhere on Wilson Creek's grounds. However for a little more we could upgrade to the new brunch that is being offered at the Creek Side Grille on Sundays. After a little discussion we decided that the brunch was worth the upgrade and put our names in. Since we had a little bit of a wait we decided to taste a couple wines in the mean time.

Can you guess who was tasting the white and who was tasting the rose?
It was pretty busy at Wilson Creek when we arrived and for anyone who has been this is normal. It is a pretty popular winery and for good reason! They have a beautiful property which has a little creek, plenty of tables outside to sit and enjoy a glass of wine, and pretty good wines to boot. They also are the home of the San Diego famous Almond Champagne (Champagne - legally true Champagne only comes from the France's Champagne region, sparkling wines that are produced in the same manner in the States are sometimes still labeled Champagne but are technically sparkling wines as they weren't produced in France. I still call them champagne and I think most people do as well!). We found a space a the tasting bar for the two of us and were greeted by a friendly older gentleman, . As we were deciding what to taste first we started talking to _, who is a retired San Diego mailman. Further into the conversation we discover that he use to deliver mail to ESFSW's grandparents in Clairmont! It is a small world. He was really helpful and  poured ESFSW extra big pours (he then shared with me - and yes things seemed to be backwards today, I usually benefit from generous wine servers). We learned that if you work for a winery in CA you can taste free at any other winery in CA and you get the club price on wines. I think this might be a good retirement job personally! After 2 tastes we decided to go check if our table was ready at the Grille.


Wine Barrels with the Creek Side Grille in the back ground. Isn't the sky beautiful!

Back at the Grille we were seated and asked if we wanted the unlimited champagne (we declined since you have to be sober to ride the horses) with our lunch or any other beverages. After receiving our coffee we went to check out the buffet. It was pretty small buffet by buffet standards but everything looked amazing. They had poached salmon, oysters, crab legs and shrimp and omelette and waffle station. As well as a veriety of breakfast meats, vegetables, pastries and fruit. Every thing was excellent! My favorite was this amazing pickled cabbage dish. I am currently in the experimental phase of trying to recreate it, however it is slow going.

Our plates!

Mmmm perfect with coffee!

Pretty!
After we ate a decent amount (we kept it sane and didn't over do it), we returned to finish our wine tasting in the time we had remaining before our riding time.

We walked to the back of the back parking lot at Wilson Creek to go horse back riding. After filling our our waiver we were assigned horses. ESFSW was put on a horse named John Quincy and I was given a horse named Ranger. We were definitely given horses with completely differently personalities. JQ was only happy out front of all the other horses and going fast. Ranger was happy going slow staying in the back of the pack. So ESFSW and I didn't ride next to each other we still had a lot of fun. I did find out that Ranger who would pick up the pace to go up hill would also get really excited and pick up speed if he saw a muddy puddle to run through. It was fun no matter what!

ESFSW's horse John Quincy

The ride was over and Ranger was happy to be back so he could have dinner!

By the time we got back from the ride we had a little bit of time so we decided to go grab a glass a wine and just sit out and enjoy the beautiful afternoon on the grounds. 

Wilson Creek!

Yup - Ranger like galloping through muddy puddles

Our sunglasses chill'in with our wine


The Creek @ Wilson Creek

Flowers in the Sun

One last picture

It was an amazing day!

Thursday, May 17, 2012

Gorgeous Tomato Spinach Quiche


I think some of you may have picked up that ESFSW and I like eggs - whether it is an omelette (his domain) or a quiche (my domain) we do enjoy a well prepared egg dish. I had been planning on making a fritta one weekend and informed ESFSW of this. His reply was "what is a fritta?" I told him it was like a quiche but without a crust! He thought for a while and said "can we have quiche instead?" I paused for a second and thought...I really didn't want to make a pastry crust. While they are not difficult I seem to be plagued by bad luck and problems that last several times I have made one and I really didn't want to deal with the roller coaster of emotions that go along with a failed pastry crust. Now I know it is ridiculous to have yourself worth wrapped up in the success of a pastry crust and yet some how I do! When one turns out I am flying above cloud nine and when it fails I am in purgatory. I think the most upset and angry ESFSW has ever seen me was when I realized I had seriously screwed up a pastry crust of a quiche. I mean with three ingredients: flour, fat and water, how one earth can one forget one!! And yet I did. I blame it on my roommates! Some how they have frequent success using oil for the fat and so I have tried, and tried and tried and have yet to turn out a pastry crust that I find acceptable. So I went back to my roots and returned to Crisco and butter....ah my old friends! 


What I used:
Crust -
1 1/4 cup flour
1/3 cup Crisco shortening (vegetable shortening)
2 Tbs butter
1/2 tsp salt
~ 2 to 4 Tbs ice water
* optional 2 tsp cayenne

Filling - 
1/4 onion - sauteed
10 medium mushrooms sliced and sauteed
2 Roma Tomatoes sliced and de-seeded
2 cups fresh spinach leaves
8 eggs beaten well
1/8 to 1/4 cup milk
1/2 to 1 cup Shredded cheddar cheese
Olive oil
Salt and pepper

~ Crust ~

In a medium bowl measure out flour and salt (and cayenne) - give the ingredients a quick stir. Add shortening and butter. With your hands (take off any rings - saves cleaning them later!) or with a pastry cutter or two knives incorporate the crisco+butter with the flour until the mixture resembles sand clumps. Add 1 to 2 Tbs ice water and incorporate into the mixture until it starts to come together. If it is too dry add more water. Don't over water you want the dough to be a tad dry but holding together pretty well. Turn out dough on to a large sheet of waxed paper. Wrap up and refrigerate dough for ~ 30 minutes (up to 1 day).

ESFSW does have a rolling pin - so a wine bottle stood in as a substitute!

When ready - unwrap dough and form a ball - leave it on the wax paper. Cut another sheet of wax paper and put it over the top of the ball of dough. Using a rolling pin (or anything about a foot long and round). Roll out the dough into a circle. Once it is the desired size and thickness to fit into a pie plate remove the top later of wax paper. Put the pie plate over the top of the exposed dough and with one motion holding on to the bottom layer of wax paper and the pie plate flip. Remove the wax paper and arrange the dough into the plate and style the edges any way you please! Set aside while you prep the other ingredients.

Rolled out dough

Crimping the edges
~ Filling ~

In a fry pan saute onions and mushrooms til they are cooked through in either butter or oil (your choice - just never use margarine because I may have to hunt you down and lecture you on why this is NOT a healthier alternative to butter! I'm a chemist so I know!).

Set the onions and mushrooms aside. Mean while heat a little olive oil in the pan. Once hot add the de-seeded tomato slices to the pan in a single layer. Let them cook about 2 to 3 minutes each side. 


Once those have cooked - turn off heat and set aside. In a large bowl beat eggs with the milk and a dash of salt and pepper (and any other spices you want). If the cheese isn't shredded yet you should get on that! Or in my case get a kitchen helper to do it (aka. ESFSW).

Bring the pie plate with the crust back over and layer the mushroom and onion mixture with the fresh spinach leaves (make sure that they are well washed and dried). Pour the egg mixture over the top of this. Carefully lay the tomatoes on top of the egg mixture and sprinkle the cheese on top and sprinkle some pepper for good measure! Now place the assembled quiche into a pre-heated oven at 375 F. Bake for 40 to 50 minutes. The egg should only jiggle the slightest when it done. Remove from oven and let rest for 10 minutes before cutting and serving.

Assembled quiche ready to be popped into the oven!

The baked quiche resting after all its hard work in the oven!

Using fresh spinach means that - it ribbons through the quiche , as seen by this cross section.

We served the quiche with mango and grape fruit salad and paired it with a dry rose wine. It was a lovely meal. and I was thankful that my crust came out wonderfully!

It looks as lovely as it tasted!
Left overs can be re-frigerated and re-heated for up to a week. While it takes a while to assemble and bake it is worth it and yields a meal for 4 to 6 or leftovers if it just you. And is a balance of all the food groups!

Happy Eating!


If you hadn't noticed the pictures in this post are much better than previous posts. That is mostly due to using ESFSW's newest toy to take the pictures and not my tablet. 


Wednesday, May 9, 2012

Cranberry Pistachio Biscotti!


It was one of those days....I had the munchies (work induced) and I needed something sweet and carb like, but there was nothing that was fitting that description in my cabinet. I could walk to the store but I know how that always turns out! I buy Oreos (random but did you know these little favorites are 100 years old!) or Fig Newtons (these are also over 100 years old!) and then consume nearly the whole box and while I am not one to worry about calories - eating that many cookies is never a good idea. I usually never buy cookies in the store and I tend not to eat a whole lot of sugar or processed foods so while I may satiate my craving I don't feel very well later and sets off another wave of food cravings as my body, that is now hopped up on sugar, tries to handle the situation. So, while making the decision to bake when I should be working usually leads me to waste and hour getting up and down from my desk and walking in to the kitchen in the end I usually yield and bake something. I decided to cut the wasted hour out of the equation and just bake some biscotti. I would be happier at the end, I would not have wasted the hour, I would have something to blog and would have something to have with afternoon coffee while I worked. 

Now what kind of biscotti should I bake. Well, I still had pistachios from an impulse buy one night when ESFSW and I were at Whole Foods buying fish for dinner and 1 lb of pistachios were on sale for a ridiculously low price! And I still had Craisens® which are now ancient (embarrassed to say probably 2 to 3 years old!) and really only good for baking. I think I should just pair these classics together (nothing original or crazy here!)


The pistachios were sadly still in their little shells so I did have to take the time to shell them. But, that also gave me permission though to snack on a few. I did this task while reading so I made use of my time.

Cranberry and Pistachio a classic!
I am not an expert biscotti maker at all. One of my favorite kinds is actually a dried cherry and pistachio recipe that I got from a good friend. So I relied on the interweb to give me a recipe. Simple search and glance over of the results and I decided that the recipe from All Recipes looked the simplest and I had all the ingredients!

You can find the recipe on their site by clicking here: Cranberry Pistachio Biscotti. I will also re-write it below all my pictures!


The recipe used Olive Oil instead of butter. So the creaming the fat and sugar together yielded a very different product that creamed butter and sugar. In some ways it was much easier than creaming butter since olive oil is a liquid at room temp. You probably don't need a mixer, although these babies always help make baking easier! I can't wait for the day I have one of my own! This one is my roommates.


Next you need 2 eggs (the other one is already in the mixer), vanilla and almond extract. I didn't not have almond extract so I used orange. Citrus pairs well with both cranberries and pistachio so I figured it would be terrible if my biscotti had an orange flavor.


After you beat in the egg and the extracts add the flour and other dry ingredients and mix well!


Stir in dried cranberries and pistachios by hand. I chopped the pistachios up a bit before hand so that they weren't such large chunks. It also means there will be more pistachio spread throughout!


Form the dough in to two logs and place on a greased cookie sheet (or use a baking mat like I did!). The dough is a little sticky. If you hands are wet the dough won't stick as much. If you find it impossible to work with you can also refrigerate the dough and then form in into logs when it is cold. Need at least an hour in the fridge or 30 minutes in the freezer.

After you bake the logs, you then remove them from the oven and carefully (they are hot) with a sharp knife cut the logs into sections. Spread out the cross sections on the cookie sheet and return them to the oven. This step dries the biscotti out.


All done! They just need to cool before I can start snacking! So while I waited for them to cool I made some coffee!


Happy Baking and Noshing!


Recipe from All Recipes (slightly modified):
1/4 cup olive oil
1/2 cup sugar
2 tsp vanilla extract
1/2 tsp orange extract
2 eggs
1 3/4 cup flour
1 tsp baking powder
1/2 cup dried cranberries
1 1/2 cup chopped pistachios

Cream olive oil and sugar together. Add eggs, vanilla and orange extract. Beat well. Add dry ingredients (not fruit and nuts) and mix until incorporated. Stir in nuts and dried cranberries by hand. Shape dough into two logs and place on a greased. Bake in pre-heated oven at 375 F for 35 minutes. Remove from oven cut logs into 1 inch thick sections. Bake again for another 10 to 15 minutes (until dry).

~ Let cool and enjoy!

Happy Baking!