Thursday, June 28, 2012

Salted Chocolate Caramel Cake take 2!


Recently my bible study was saying good bye to one of our members, who was leaving to start a training program with Radius International. At her farewell picnic the previous weekend I asked if she would enjoy a celebratory good bye cake on the following Thursday. She like the idea but didn't know what she wanted. ESFSW jumped in and suggested I make the Salted Chocolate Caramel Cake I had made last December for a friends Post-Defense party. I blogged about this cake in one of my first couple posts. But, because the idea for a food blog hadn't come to fruition yet I didn't have any pictures of the first cake I made, so I had to grab stock photos from the interwebs. This time around I did remember to take pictures of the final product!

Cake layers out of the oven and cooling!

Final product!
The group loved it and again voiced opinions that they think I should open a bakery....maybe in retirement...

Happy Baking!

Tuesday, June 26, 2012

Simple Shells

A couple weeks ago I posted the recipe for Avocado Stuff Shells, but today I am posting a simple stuff pasta shell recipe that can be a quick week night dinner made up of the left overs from my previous cooking adventure. I have learned from the years of being single and living off a graduate student stipend that you don't throw away any left overs. Over the years I have gotten creative at combining left overs to some really interesting meals. This one was a particularly good brain wave. I made a single serving since I was eating alone this night but this could be easily made for more than one. 


I had left over uncooked pasta shells that I boiled. I also had about 1/2 cup of unused ricotta cheese from the previously mentioned recipe. I also had recently bought a rather large amount of fresh basil from Trader Joes. I minced up enough basil to make 1/8 cup. I stirred this into the ricotta cheese with salt, pepper and granulated garlic to taste. Into the cooked pasta shells (4) that I have drained and rinsed I stuff the ricotta mixture and place the shells into a bowl. I stop the pasta with the left over marinara sauce that I heated in the microwave (heat in glass or ceramic!). I then topped the whole dish with some more fresh basil.

Voila! 

A great dinner for 1 on a week day night. I think it took me about 20 minutes (a good portion of that was just boiling and cooking the pasta!). To make this four 2 just double everything! 

Close up on the ricotta basil mixture!


Sunday, June 24, 2012

Blueberry Galette


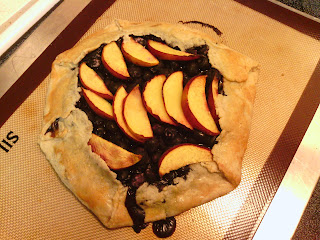
My Strawberry galette had been such a wonderful experience I decided to make a blueberry galette for dessert one night when a friend was coming over for dinner and to stitch pdfs of her thesis together. I decided it would be fun to top the blueberries with a nectarine. While my galette turned out great that night, the thesis had to be assembled 3 more times before it was accepted.

What I did:

First make a pastry crust following the recipe on the post for the Strawberry Galette. Place the rolled pastry crust on a baking tray (silicon mat optional).

Because fresh blueberries were rather expensive I picked up a bag of frozen blueberries from the local market. I let these thaw and drained off some of the excess juice. Next I tossed the blueberries with a couple tablespoons of a flour, cornstarch and sugar mixture (feel free to add a little cardamom or any other desired spice as well!)

Next cover the pastry crust with a light dusting of flour. Pour the blue berry mixture on the center of the crust. Using a soft spatula fold the edges over to cover the fruit.

Arrange sliced nectarine on top. Brush the crust with egg wash and place galette in a pre- heated 350 F oven for 45 minutes.


Remove the galette when the crust has browned and the fruit filling is bubbling.


Let rest before serving!


~ Happy Baking! ~


~ Recipe ~

~Pastry Crust~

Follow directions from here

~Filling~

Thaw 1 lb frozen blueberries - and drain of excess liquid
2 Tbs flour
2 Tbs corn starch
2 Tbs sugar
1-2 tsp cardamom (optional - you can use other spices)

~Assemble~ 

Roll out pastry crust. Dust top with flour. Place blueberries in the center of the pastry crust and carefully fold up the sides using a spatula. Brush the exposed crust with an egg wash. Top with a sliced nectarine (if desired). Bake for 45 minutes in a 350 F oven.

Saturday, June 23, 2012

Strawberry Rhubarb Pie


Sunshineville is great for the supply of many a fruit and vegetable, but there are some limitations. One glaring one in my opinion is rhubarb! We just do not have the right climate to cultivate this odd little weed which requires a cold snap to break its winter dormancy. While Sunshineville can occasionally get down to the low 40s at night that really isn't enough. Come the spring some of the grocery stores will have some rhubarb, usually at prices that make a friend of mine who grew up in Minnesota scoff! But, I buy some anyways because I love all things rhubarb!

A couple years ago when hiking in the San Raphael Wilderness area north of Santa Barbara I happened upon a small plant that looked like it could be wild rhubarb. No idea if it was or not, but it was cool to see!

Photo
Wild Rhubarb?

Photo
What do you think?

With  rhubarb in hand I decided to make a pie!

Here is what I did:

Rinse the rhubarb stocks well, trim the tops and bottoms off

Cut up 2 lbs of rhubarb cut into 1/2" pieces


In a medium size pot, put the cut up rhubarb (reserve a 1/2 cup) with a 1 cup of water and 1/2 to 1 cup of sugar. Put over medium heat and bring to a boil. Reduce heat and simmer until the rhubarb has cooked down to a compote consistency (about 30 minutes). After the 30 minutes add the remaining rhubarb and continue to simmer for 15 minutes.

Make a pastry crust for a double crust pie. Take half of the pastry dough and roll it to make the bottom crust. Place crust in a 9" pie plate. Cover the crust with the rhubarb mixture. 


Now line the top of the rhubarb with sliced strawberries.


Roll out the reminder of the pastry crust. Cut it into strips and arrange in a lattice pattern. After the lattice was arranged I finished the edge.


Place the pie in a pre-heated oven at 375 F. Bake for 30 to 45 minutes until the crust has browned and the filling is bubbling. Let the pie cool at least 15 minutes before serving.

All done!
Excellent eaten on its own or with vanilla ice cream!

Happy Baking!


~ Recipe ~ 

Pastry Crust for double crusted pie: You can double the recipe used here
Rhubarb compote
1 lb strawberries - sliced

~Rhubarb Compote~


2 to 3 lbs of Rhubarb (chopped)
1 cup sugar
1 cup water

Put the rhubarb (minus 1/2 cup), the water and sugar in a pot and bring to a boil. Simmer for 30 minutes. Add the reserved rhubarb and simmer for 15 more minutes. Use immediately or refrigerate for up to 5 days or freeze for up to a month.

~Assembly~

Roll out 1/2 the pastry crust and line the bottom of a 9" pie plate. Add rhubarb compote and then arrange sliced strawberries on top. Make a lattice top by weaving stripes of dough across the top of the pie.

Bake for 30 to 45 minutes at 375 F. Until crust is golden and filling is bubbling.

Friday, June 8, 2012

Avocado Stuffed Shells


Years ago when I was going through and copying recipes from my mom's collection I happened upon a recipe for Avocado-stuffed Shells. To be honest there was a part of me that always thought this sounded a bit weird. I associate avocado with Mexican food and served cold, not Italian food served warm. So, I avoided this recipe in my card file. Although I did take the time to write it down so I thought I should try it.  I believe this was a recipe that hails back to my grandmother, but I am not 100% sure. If it does she was a head of her time living in Wisconsin mixing avocados in with Italian food. I wish she would have lived longer because she loved to cook and even could have been considered a gourmet. But, I smile knowing that even if she did not live long enough to teach me how to cook and give me advise, I know I inherited her love of cooking and she is looking down from heaven hopefully smiling! If I ever do find out the whole story I will be sure to share along with my recipe tweaks!

What I Needed:
Shredded Mozzarella
Ricotta Cheese
Avocados
basil and oregano
Large Pasta Shells
Basic Marinara Sauce
(see Recipe below for exact amounts)


What I Did:

Boil water in a large pot with a little oil in it. Cook 20 (plus a few extra) of the shells for 2 minutes under the al dente cook time. You really don't want to over cook the shells. They will be impossible to fill without loosing structural integrity. When you bake this dish you the noodles will continue to soften a bit so you won't be crunching into dry pasta shells.

Drain the water and rinse the shells in a colander with cold water and let them sit to cool down a bit. Best not to handle these straight out of boiling water unless you want burned finger tips!

While the noodles are cooking/cooling mix up the cheeses, avocado and herbs. Then when the shells are significantly cooled fill each one with a spoonful of the cheese/avocado mixture.

Stuffed Shells!

In for the close up! See the bits of avocado....mmmmmm!

Once all the shells are stuff cover with a Basic Marinara sauce

This should look familiar! (If not see previous post)

All smothered!
Bake for a while uncovered and un-cheesed. The last 15 minutes top with shredded mozzarella and continue baking.


The last 5 minutes turn the boiler on low and toast the top. Please don't wander away during this step. It is only 5 minutes and broilers left unattended like to burn food to a crisp!

Resting for it gets served
And in for the close up!


Gorgeous!

We paired this dish with some asparagus. But a nice green salad or some other greenery would be equally good!

Happy Eating!

~ Recipe ~
1 cup grated mozzarella cheese (low moisture - don't go breaking out the Buffalo!)
1/2 lbs (8 oz) Ricotta cheese
2 ripe medium Hass/Fuerte avocados (just not the West Indian Varietals! aka Florida Avocados) - diced
1/2 tsp salt
1 tsp white ground pepper
2 tsp dried oregano
2 tsp dried basil
20 Large pasta Shells (Conchiglie)

Basic Marina
Grated Mozzarella for on top
9" x 13" pan

Combine cheeses, avocado, salt, pepper, oregano and basil in a boil. Cook shells in a large pot of boiling water with a touch of oil until just starting to soften*. Drain and rinse the shells with cold water. Handling carefully, fill each shell with a spoonful of the cheese and avocado mixture. Arranging them in the 9"x13" pan. Cover the shells with Basic Marinara Sauce. Bake in a pre-heated 350 F oven for 25 minutes. Top with shredded mozzarella and bake for another 10 minutes. To brown the cheese on top, broil on low for NO more than 5 minutes (best to just keep an eye on the oven for this time!). Let the dish rest for 5 minutes before serving!


*Best to go a minute or two under the cooking time because you will be baking this dish and it is hard to fill the shells without ripping them!

Wednesday, June 6, 2012

Basic Marinara


Marinara Sauce - the starting point for most tomato based pasta sauces. While it is easiest to go to the store and buy a jar and heat n' serve it may not give you that taste and flavor you are seeking! The best sauces are always made from scratch and allowed to simmer for hours to intensify the flavors. Here is a recipe for a basic marinara which can be doctored with other ingredients to make other sauces.


~ Recipe ~

Olive Oil
1/4 diced onion
3 cloves garlic minced
28 oz can Crushed Tomatoes
15 oz can Tomato Sauce
6 oz can Tomato Paste
1 to 2 tsp dried basil
1 tsp dried thyme
1 tsp oregano
Tabasco Sauce (original) [This is not added for spice but to balance out the tomato paste with a touch of acidity]
salt to taste
* 1/8 cup shredded fresh basil

In a large pot heat olive oil on medium high heat. Add onion and saute, once it starts to turn translucent add garlic and continue to saute. Don't let the garlic burn. Add the crushed tomatoes and tomato sauce plus the dried spices. Once it comes to a simmer reduce the heat and continue to simmer for 30 to 45 minutes. Stir occasionally. Add the tomato paste and at least 10 shakes of Tabasco (I used closer to 20). Let simmer for another 30 to 45 minutes (up to 2 hours). Add fresh basil in the last 20 minutes. 

You can use this immediately over pasta, add additional items like mushrooms, sausage, peppers ect. To make it extra spicy use red pepper flakes or siracha added with the tomato paste and Tabasco. This sauce is excellent for bakes pasta dishes like my next post.

You can also easily make a double or triple batch and freeze portions of the sauce to be used later!


Happy Cooking!


Tuesday, June 5, 2012

Craft and Commerce Take 2

Photo 

Recently ESFSW and I decided to get San Diego Zoo passes. If you live near by or even within the Greater Southern California area Zoo passes are a great value. The San Diego Zoo is quite spectacular and is a great place to spend a couple hours wandering around. The benefit of zoo passes is that you get in to the San Diego Zoo and the Safari Park in Escondido for a year plus free rides on the Sky way in the Zoo and the Safari Bus Tour in the Safari Park. We spend the afternoon wandering around a rather crowded Zoo (it was Memorial Day Weekend) after we ate a picnic lunch outside the Zoo. It was fun even though there were a lot of people wandering. ESFSW had his new fancy camera and the animals were pretty active.


Lions and TIGERS and bears, OH MY!

My favorite animal in the world! Otter! (This is an African Spotted River Otter, with a salt lick )

Polar Bear trying to get some food - forget that carrot right next to him, he wants the good stuff!

The other polar bear testing the water for a swim

Elephant!

A local rattle snake (ESFSW forgive me I forget which kind!)

"Whatcha looking at?"

A lot of the animals were out...

...but some where just sacked out...

...and others were stalking small children in their enclosures.

We had to visit the reptile house and take pictures of all the snakes for ESFSW

Hakuna and Matata with one of the handlers

Another Otter! (we spent an equally long time here for me since we spent quite a bit of time at the reptile house)

Drying off after a swim

Making sure his bed was clear

and off to more mischief!


Now on to Craft and Commerce!

Panorama


So from the Zoo we decided to head over to Craft and Commerce so that I could share the experience with my love. I was expecting a wait - although it was fairly early on a Saturday for the dinner crowd, so we were  sat immediately. In some ways it would have waited to be seated because we were seated by two women finishing up their dinner and they were loud...well one of them was loud. After they finally left ESFSW leaned over and stated that he would have shot himself if he was her boyfriend. I don't think he would have ever asked her out to begin, :p. On the other side of us was another odd


I think we had the same waitress from when I had been here with friends for my birthday. The beer selection was pretty good and they even had one of the Stone Imperial Stouts that ESFSW and I enjoy. I decided I was going to splurge and get a cocktail since they have such interesting ones at C & C. After perusing the menu for a while I decided to go back to one of the ones I had had the first time I was here, the Milano Swizzle! It didn't come with salt on the rim like the last one but it was as good as I remembered. ESFSW agreed it was pretty good!

Scrapbook photo 5
Where we sat
We got an order of fried pickles started right away. They were as delicious as before however they had garlic adorning them instead of blue cheese like before. They were still good. Although there seemed to be a lot more of them when split between two people instead of four!

For dinner we decided to split the citrus avocado salad and the ribs. The salad was amazing with a lot of avocado and citrus and jicama and flavored almonds. The ribs were a dry bbq with a peach glaze which was not to sweet. The ribs were served with the wonderful tangy coleslaw and a jalapeno cheddar biscuit. We will have to come back so ESFSW can try the chicken and then possibly again for the Mac n Cheese!

Happy Adventures!